

Simple, leave a comment on this post and you are entered. If you would like to follow to see what I hope to have happen in a month or so that would be great but not required.
Winner will be drawn by random generator on Wed. June 2nd at 10pm EST
Please leave a way for me to contact you.
Thanks and good luck
OK folks the last post was 185 at 10pm, going to do the drawing now
Sunday, May 30, 2010
Changes
Hang with me folks as I try to make this a functioning blog. It might take me a while and you might see some new changes that are not yet functional (such as the static bar above) but I am working on getting this blog more user friendly.
Friday, May 28, 2010
Full set of demo display
Here is my Father's Day themed demo set up. I made the guitar cake using HM cart for the guitar and Holiday Cakes for the saying on the cake. Duff fondant to cover the cake and regular fondant for the layers. Frosting sheets for the saying.
Card was made using HM and Blackletter. Gift box and wallet using TBBM and Cuttlebug for embossing. Shirt made using HM and Blackletter on the Yudu machine. And shirt gift box again using HM.


Card was made using HM and Blackletter. Gift box and wallet using TBBM and Cuttlebug for embossing. Shirt made using HM and Blackletter on the Yudu machine. And shirt gift box again using HM.


Sneak Peak and this weeks demo stuff
Ok this is not completely done, I need to do some piping around the bottom since I did not do the best job with the fondant around all the curves and I had no cake stand to hold a guitar. But here is a peak at what is coming up


Tuesday, May 25, 2010
Facebook pages
I started a Facebook group yesterday, a space so that everyone can show off their Cricut Cake creations and a place we can ask questions of each other related to the cake.
Cricut Cake Creations
And don't forget the Official Cricut Cake Page, an awesome site
Official Cricut Cake Facebook page
and there is also the Cake forum on the Cricut Messageboard.
Cricut Cake Creations
And don't forget the Official Cricut Cake Page, an awesome site
Official Cricut Cake Facebook page
and there is also the Cake forum on the Cricut Messageboard.
Monday, May 24, 2010
No food today
wow is it ever HOT. Dinner is Micky D's large sweet tea. Hope you all are having fun with your Cake machines.
Friday, May 21, 2010
A few more goodies made today with the Cake
Homemade poptarts and a loaf of bread


 Yummy strawberry homemade poptart type things
will be adding the bread when it comes out of the oven
well here is the bread, did not come out so good as I was trying to do a million things at one time, but you can get the idea and I will be trying another loaf Monday.


will be adding the bread when it comes out of the oven
well here is the bread, did not come out so good as I was trying to do a million things at one time, but you can get the idea and I will be trying another loaf Monday.
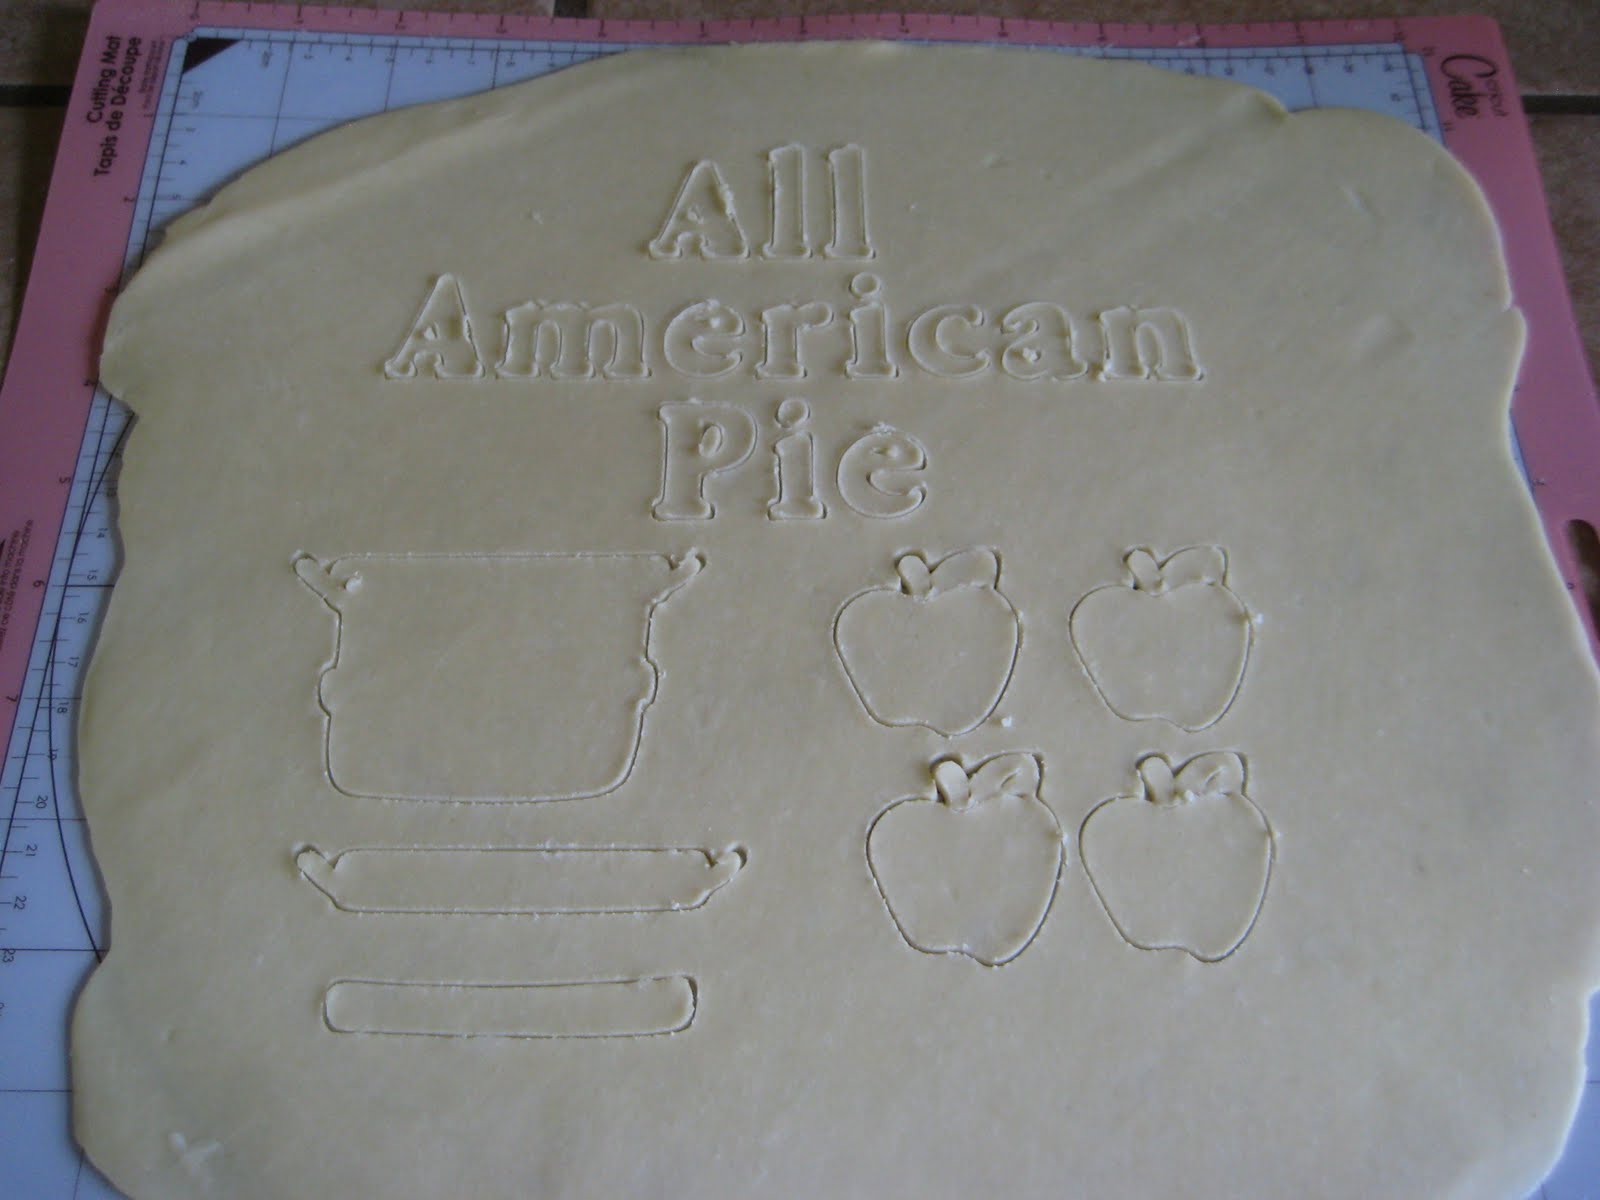
All American Pie
So hubby is not really the cake type and asked for a pie to match the American theme I had going on, nothing like a last minute request LOL
Here are pictures of the cuts in pastry dough, and layered on half baked pie and then also the finished pie, excuse my lighting , it makes it look like the center is not done but rest assured it is done.


Here are pictures of the cuts in pastry dough, and layered on half baked pie and then also the finished pie, excuse my lighting , it makes it look like the center is not done but rest assured it is done.


Wednesday, May 19, 2010
Easy ribbon cupcake
Here's hoping that linking the videos here work. No voice, but it really is a simple assembly and I think you should be able to do one of these within minutes. If you have any questions please ask
this one is of the stitching of the ribbon. Ribbon should be about 8ft in length and smooth satin, not the paper feel kind. Ribbon will be 4ft or less when done.
this one is of the stitching of the ribbon. Ribbon should be about 8ft in length and smooth satin, not the paper feel kind. Ribbon will be 4ft or less when done.
New Demo setup for the upcoming weekend


Tuesday, May 18, 2010
Starting on May 19th
I am going to start going through my cartridges, in order they are in Design Studio and make an item of some type with a cut from a new cartridge each day until I get through all of my carts. I think I might just use a random generator to give me the page, and cut number so I have to reach out of my comfort zone and put these things to use.
If you would like to play along I would love to have your post.
Now I am off to finish my cake for this weekend. I will post that tomorrow but that will not be part of my new "cart usage resolution"
Thanks so much for all the new visitors and followers, you make my day to see you here.
If you would like to play along I would love to have your post.
Now I am off to finish my cake for this weekend. I will post that tomorrow but that will not be part of my new "cart usage resolution"
Thanks so much for all the new visitors and followers, you make my day to see you here.
Friday, May 14, 2010
Demo set up for this weekend
I kind of wish I would have made the top of the fake cake smaller, but I wanted to make sure that I had enough frosting sheets for the demo (I was unaware that more were being shipped out this week) so I didn't redo it and now I am just plain too tired to redo. Perhaps I will have time to redo it for the Sunday demo.


 The big card is 5x7 and made with Lyrical Letters, and Martha Stewart edge punch. Small card is unknown, I just cut to eyeball since I didn't need to have an envelope, I used Preserves for the cherries, Martha Stewart Punch again and You're Invited from Alphalicious. The cupcake wrapper is from Easter 2010 at 4.5 inches with a cherry from Preserves with a styrofoam ball and satin ribbon threaded to resemble whipped topping, the cherry is a wooden ball colored red with a Sharpie and the leaf is one from a silk plant here at home, hand trimmed to look kind of like a cherry leaf, held in place by a brad that was also colored with a sharpie. The cake wording is again from Lyrical Letters (red and green is fondant and white is the frosting sheet) on the boarder the cherries are the card feature on Hello Kitty Greetings, all the colors of the boarder are fondant, all cut with the Cricut Cake of course.


Thursday, May 13, 2010
What a honor for me
I have been invited to be a guest designer on the wonderful Blog TUESDAY TREATS. This month the talented group of ladies is working on the cartridge Forever Young. I had made a wonderful purse and bought lots of bling to apply to the purse and then Lady G decided that for the 2nd time this week she would misbehave. Only this time she was not to return to her wonderful self. Hoping PC can help fix her soon. Luckily though I am currently doing the demos for the new Cricut Cake and part of our demo package was a Gypsy (which we have to return) the only issue is it only has the pre-loaded Gypsy Wanderings and Gypsy Font and then the 4 Cake cartridges we loaded.
So my problem then became, cheat on the Gypsy design and make the Forever Young purse on DS or use my demo G and try to come up with some kind of purse. I went with using the demo G and trying to make something. Another bump to my road was that I have 3 year old grandson that can hear a Cricut start up a mile away so there is NO crafting without his involvement.
So without further ado, I give you our (yes you get two designers this week, myself and the wonderfully talented Trenton) purse using the Gypsy and the Holiday Cake Cartridge.
 This is by no means your regular purse. However Trenton wanted to make a Car Purse for his mom. So we made this cute little handbag that can be left sitting right inside the door that his mommy can easily drop her car keys and sunglasses in and she will always be able to find them easily.
The first step of this design was to make two of the cars on blackout in our green cardstock. We made the car 8.20w x 7.88 h
 Then we used GW to make the bottom of our purse we just choose a shadow blackout of a rectangle making it 15.11w x 3.88h and on this page we also added another green blackout of the car for the back of our car and the layer of the car for the front (again cut at 8.2x7.88)
 after this we need a black layer for the fender and the tires. So we cut 2 of the regular cut again at 8.20x7.88, I needed one of these to have the cut outs so we could know exactly where to place our silver cardstock for the headlights and grill. Working with a 3 year old and trying to get it done quickly I just made them both the same, although the back one could have been cut on shift so it did not have the details.
 Then came assembly (boy was this a joy) I started by scoring 1/4 inch in on each long side of the rectangle we had cut
 Then just eyeballing what we thought would be close we scored the short sides knowing that I wanted the base to be about 7 1/4 long to fit the bottom of the car.
 Next we folded all score lines and then again using just the eyeball, sniped out the inside corners for folding. And using the ATG gun taped all the outside folds and sit aside
 At this point we began assembly of our car, we started by cutting the windshield trim off the black cars, it is just easier not to have one more thing to try to line up and not have showing. Then we had to layer green shadow, black cut and and green shadow for the back, at this point we trimmed off the washer wipers since this would be the back of the car. Laying this down we then added the prepped rectangle along the bottom of the car body
 the front was done next by leaving the wipers on this time and adding metallic silver cardstock cuts (done by eyeball, hand and scissors) to the grill and headlights.
 Then we layered the green layer with the grill cut out on top of our black and silver layer. Then we had to find something to help us stand our car so that we could adhere the front to the rest of the purse. A bottle of glossy accents was just what we needed.
 Once our "purse" was complete, we needed to add something, since I was unable to add all the bling I had bought for my FY purse. We used the key from GW on shadow at 1.23x2.68 we placed 4 of them on the matt and then used the flip feature to put 4 more on the mat, which we cut from gold metallic cardstock.


We had made enough cuts for 4 keys (when all parts were glued with one regular and one flip cut) but a little guy wanted to play with some of the keys, so we ended up with only 2 keys for our key chain. Being this was for his mom and he "helped" make it he wanted a blue keychain, so we used a small piece of blue rope to make the key chain and used our white pen to write Mom's taxi on the front plate. By the time I was able to get this done with the help of a 3 year old, it was so late and eyes were drooping so I am sorry that I could not do a better final shot of the "purse"

 I am very sorry that this is such a simple project, had Lady G not had her problems I could have done better, but I am one that works better closer to a deadline, so although I had laid out my FY purse, I waited until the night before to cut, I might have had a better chance to do this blog justice had I started earlier, but that is what happens when you live your life waiting until the last minute, you have to do what you can.
I may speak with Pam and ask her if it would be ok to try to do my purse with DS and post an extra post later this weekend and you all can then convert that cut file to a gypsy file. I will be back in a bit with the cut file for this. I have to recharge the demo Gypsy to be able to transfer the file.
So my problem then became, cheat on the Gypsy design and make the Forever Young purse on DS or use my demo G and try to come up with some kind of purse. I went with using the demo G and trying to make something. Another bump to my road was that I have 3 year old grandson that can hear a Cricut start up a mile away so there is NO crafting without his involvement.
So without further ado, I give you our (yes you get two designers this week, myself and the wonderfully talented Trenton) purse using the Gypsy and the Holiday Cake Cartridge.

The first step of this design was to make two of the cars on blackout in our green cardstock. We made the car 8.20w x 7.88 h


We had made enough cuts for 4 keys (when all parts were glued with one regular and one flip cut) but a little guy wanted to play with some of the keys, so we ended up with only 2 keys for our key chain. Being this was for his mom and he "helped" make it he wanted a blue keychain, so we used a small piece of blue rope to make the key chain and used our white pen to write Mom's taxi on the front plate. By the time I was able to get this done with the help of a 3 year old, it was so late and eyes were drooping so I am sorry that I could not do a better final shot of the "purse"


I may speak with Pam and ask her if it would be ok to try to do my purse with DS and post an extra post later this weekend and you all can then convert that cut file to a gypsy file. I will be back in a bit with the cut file for this. I have to recharge the demo Gypsy to be able to transfer the file.
Wednesday, May 12, 2010
I've created a monster
So the following little guy has showed up at my house to visit for the week, he has been in love with the "spression for some time now, and then when he showed up there was a "FOOD CUTTER", oh no a new addiction LOL
 this was last night and here we go onto today, I have to get some high sugar fruit juice or someone is going to be having problems with all that cheese


Friday, May 7, 2010
Dinner time
So it's time for more testing. How about a wonderful thin crust pizza? Yep done on the Cricut Cake again LOL
 Please don't judge the abilities of the machine on my ability to apply sauce and cheese on a pizza, it was just another quick try it to test the limits of the cake machine.

Thursday, May 6, 2010
Just had to try it
so here is my first quick attempt at a rose with the Cricut cake, ala Tim Holtz grunge style.
 I can't remember if I used the Birthday or Basics cart but the flower was cut on shadow at 3 inches

Tuesday, May 4, 2010
First Demo
So my first demo was fun. Only sold one cake machine :) but overall the experience and the feedback was good.
I am playing with many other food mediums this week, (I had hoped for today, but it looks like OTHERS have decided to make plans for my time :( )
So be watching tomorrow for some more samples of items that can be cut with this wonderful machine, and should you decide you really like, please don't hesitate to get in your vehicle and drive to the Michael's store in Portage MI and buy one LOL
Saturday, May 1, 2010
Some of my attempts with the new Cricut Cake
I was one of the lucky folks to be hired as part of the Cricut Demo Army to demonstrate the new Cricut Cake machine at Michaels this coming month. So in order to get ready to demonstrate the machine properly I have been practicing at home.
Here are a few of my samples.

 These here are little cowboy boots from the cake cartridges also, they were cut from Kraft American cheese slices at 1 and 1/4 inch, I have to tell you this machine cuts cheese and bologna like nobodys business.
 These cute little cowboy hats (also from the cake cartridge) are sugar cookies, yep sugar cookies. The cookie was cut on shadow at 3 inches and the hat and band were cut from fondant at 3 inches.
Here are a few of my samples.

This is actually an 8 inch round styrofoam piece that I have covered in fondant and decorated with cuts from the Cricut Cake Basics cartridge, the shape cuts are at 7 1/2 for green doily, 6 for the yellow design and 3 for the flower and the white circle was at 1 inche and the lettering (also from Cake Basics) is at 2 inches.


Subscribe to:
Posts (Atom)